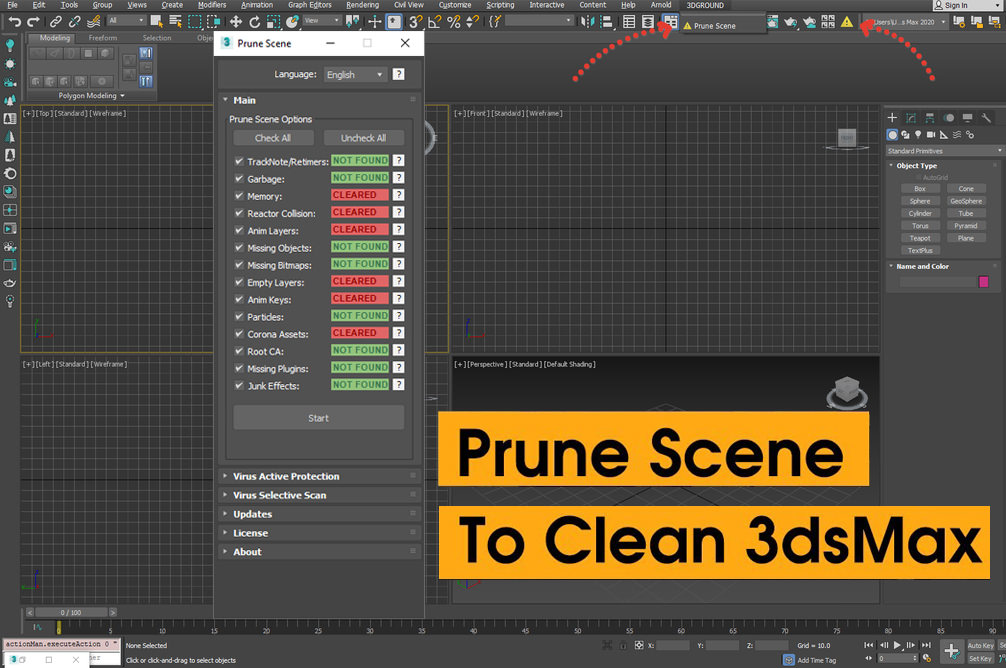
With Prune Scene you can clear your 3Ds Max scene from scripted viruses and accumulated garbage.
This allows in some cases to greatly reduce the size and accelerate saving of scene.
Prune Scene v3.6.2 for 3dsmax 2012-2025
5,00 $
Prune Scene 3.6.2 – Best cleaner for Autodesk 3Ds Max 2012-2025
With Prune Scene you can clear your 3Ds Max scene from scripted viruses and accumulated garbage.
This allows in some cases to greatly reduce the size and accelerate saving of scene.
The problem with animation layers is that they propagate through scenes whenever you merge something from a scene that has them. This is typical of stock assets from sites like 3dsky or cgtrader where people submit their own stuff with little to no oversight. Prune scene script remove such nightmares in one go. They can cause many problems within your scene. Often models downloaded from the internet have a history behind them. They can stay from previous work and can cause max to have many bugs.
Why Prune Scene better then other cleaners/antiviruses:
- Continuous workflow (install then Clear or Disinfect without reopen 3Ds Max or external program install)
- Multi language interface
- Auto register menus interface
- More virus signatures (now available 7 signatures)
- Selective scan for viruses (without open files; scan whole partition as C:, D:; you can continue work when scanning)
- Protect startup scripts folder from virus injection
- Batch disinfect files (find viruses with Selective Scan then disinfect them all)
- Silent notifications (log only). Best for render-farm nodes. Other scripts appear modal notifications that stop the render process
- Instant updates from script
- Client support
Features:
- Clear Track Notes
- Clear Retimers
- Clear Mixers
- Clear Garbage Collection
- Clear Memory
- Clear Reactor Collision
- Clear Animated Layers
- Clear Missing Bitmaps
- Clear Corona Renderer Missing Assets (HDCache.hdc, LUT (*.cube))
- Remove Empty Layers
- Remove All Animated Keys
- Remove Missing Objects (LinkComposite, etc.)
- Remove Invalid Objects (ParticleView, etc.)
- Remove Viruses (ALC, CRP, ADSL, DesireFX, AlienBrains (mscprop.dll), PhysX Plugin Mfx, etc.)
- Fast Selective Scan Viruses
- Instant updates
- Multi language interface
- Batch Disinfect files from viruses
- Active Protection from viruses (also protect startup scripts folder)
Newer versions of Prune Scene use the Universal Installer to guide you through the installation, and create buttons in the Main Toolbar and Quad Menu. Everything is done so that you make a minimum of effort and do not waste precious time.
Run the installer, just Drag&Drop the PruneScene.mzp file into the Autodesk 3Ds Max Viewport.
Or run PruneScene.mzp using the Scripting → Run Script.
After starting the installer, you will see the next window:
Select the interface language, click Next.
At this step, you can customize the installation options. For example, where to create a button in the interface (Main Toolbar, Quad Menu, Main DropDown Menu).
We recommend leaving all the default options and click Next. Below is a description of what each option does mean if you want to change anything.
Tool Bar (Recommended) – creates a button with an icon on the Main Toolbar.
Main DropDown Menu – creates a new dropdown menu named 3DGROUND next to the Help dropdown menu with subitem Prune Scene. If other scripts from this site are installed, they will be added to the 3DGROUND dropdown menu.
Quad Menu – creates a new Prune Scene menu item in the QuadMenu.
Use HiDPI icons – use vector icons (SVG) for high resolution monitors. If your 3Ds Max is greater than 2018, which has official support for higher resolution monitors, you can enable this option. Icons will work for regular monitors as well as monitors with higher pixel density.
Setup Options – you can choose to Install or Remove the script.
If the installation was successful, you will see the following window. Click Finish to exit the installer.
You can now run the script from the Main Toolbar or the 3DGROUND dropdown menu.

